My overall experience has been mostly positive about the work that i've produced for this module, there has been points that I've found difficult like my Maya scene not being able to save and the texturing didn't work how I wanted it but I got over it. I found that during the module I've learnt a hell of a lot of new techniques and skill in particle simulations and I'll be using these skills in my Extended Practice module. I've also delved into new software, Blender, and tried to create simulations in there, and I now have the courage to delve into other softwares like Houdini if it's not too expensive.
Different Solvers / Softwares I've used
Throughout the module I've only used two different softwares, Autodesk Maya and Blender, both are good at particle simulations but in my opinion I found Maya to be the better software. This is because maya can have more control over the particles and it uses a better solver, the FLIP, where as Blender uses the Smooth Particle Hydrodynamic (SPH) solver. I've found that Blender was simple enough to used for modelling and lighting but when it came to the FX I found it to be a bit awkward to use, this may be because I'm not used to the software but I just had to keep looking at tutorials to figure out how to use the simulations system. I feel like I've learnt a lot more in the software Maya and how I can use Bifrost for smoke and liquid simulations to create character elements.
Animation Testing
I've found that with the testing there was a lot of waiting around for my computer to process a slight change that I made in a simulation. This would be because I'm manipulating over 10 to 20 million particles but I'd only change something small like the size of the foam or the amount of churn the wave produced. With the testing I learn what can control the particles in the simulation, like fields and forces or accelerators and guides. I found that the accelerator give me the ability to control the amount of a destructive look I could give the wave. I've also found myself watching many tutorial on particle simulations and now feel like I could create my own tutorial with the knowledge I've gathered watching others.
Writing
For the writing side of this module I found it to be interesting if I knew what I was talking about but if I had trouble knowing what I was going to write it would take hours for me to write like a couple hundred words. Don't get me wrong this was the most interesting essay that I've written and I'd carry on the research to further my knowledge. Actually writing the dissertation wasn't as daunting because I split it up into different chapters and so it made me think that I just had four or five different essays which had about 2-3000 words in them. This make it easier for me to construct my dissertation and keep on top of what I was talking about so I don't end up waffling or repeating my words.
I've found that overall this module has been interesting and helped me gain more knowledge in the different softwares. And this module and helped guide me for my other modules. I'm also pleased with the practical outcome that I've produces and I'd like to continue making more simulations in the future.
Tuesday 10 January 2017

CoP 3: Conclusion of Practical work
For my practical I wanted to research and explore different softwares and solvers for particle simulation and find out how you can add a character element to the simulation. So for my final practical I produced a simulation showing the different stages it takes to create a realistic water simulation where I can control the particles to have some sort of character element in it. For this practical I used the software Maya because for me it's the software I'm most familiar with and it's the simplest software to create and control the particles. I also used the FLIP solver for my simulation because it's a very powerful system and it stays stable when 10s of millions of particles are flowing on top of each other, it is also able to create more detail within the simulation compared to the SPH solver.
I used Bifrost in Maya to create the liquid simulation because I found that if I use that instead on the fluid dynamics I'll get better results and more detail with greater control over the particles, plus I could add an accelerator to the simulation to make it more dramatic and it adds more character element to the scene due to the ferocious movement. I have about 10 to 20 million particles within the simulation so that I can get the best detail my computer can allow, and this gives better indication to what the particles are doing and how they act in the simulation. Adding the accelerator to the scene helps give more character element to it because it gives the wave more force when crashing through the window, which give the wave an aggressive and intimidating characteristic attributes. Below you'll see the different stages in creating a liquid particle simulation.

I've also created a video demonstration the different stages in creating a liquid particle simulation. I did this by capturing playblasts within Maya and rendered off animations showing how different the particles look when in the Maya work space and when it's rendered out. Rendering the final outcome did take about 24 hours to do but I feel like it was worth it.
I'm quite pleased with my final outcome of my practical even if I did have some problems with the texturing of the water and the lighting. The video demonstrates the different stages well and you can tell the differences between them and why they are needed to create a realistic water simulation. Other people and I have found that the force that the wave comes out is very effective and gives the simulation character elements. However, I feel like I may have made the wave too foamy for my liking because of all the white water in the scene. I think this is due to the fact that I put the curdle rate quite low so that the water produces more foam so if I was to change anything about the simulation I would change that.
CoP 3: Further Research on Particles in Films
I've also done some research on three other films that I haven't mentioned in my dissertation. I haven't talked about these in my dissertation because they had no new way in creating particle simulations but they show a great use in particle simulations. The three films I've researched are 'Ratatouille', 'Pompeii', and 'Harry Potter and The Order of The Phoenix'.
For the film 'Ratatouille' they had a scene early on where the main character was swept through the sewers of Paris, plummeting down waterfalls and along steeply sloping tunnels. The film's water sequence was complex and was magnified by the interaction of camera and character animation with the water simulation. Before they could begin animating the cameras the fx team had to coarse low-resolution simulation of the entire length of the rapids for several hundred frames, doing this allowed the layout department to figure where the camera angles and animation would go. The simulations were done using there in house particle-based simulator, Splasht, and a surface mesh was extracted from the particles.
Because the rapids were so rough and violent it will require foamy white water surfaces for most of the shots. The effects were generated by fluid and particle simulations in the Autodesk software Maya, which was controlled by the result of the water surface simulation.

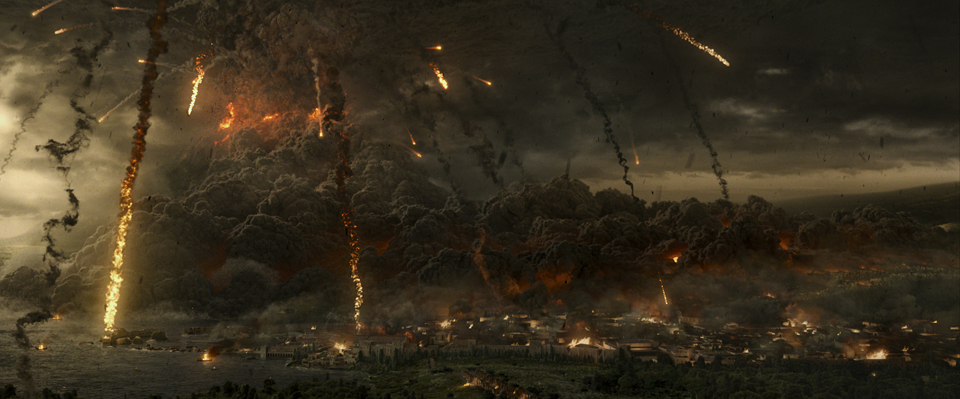
For the second film I researched in to the disaster film 'Pompeii' because of the smoke simulations they produced for the volcano. The film had big ambitions with a compressed timeline but they came out with good effects. Paul W.S. Anderson was the director of the film and Chris MacLean was the CG supervisor, they've done four films together including this one and Chris has also worked on films like Resident Evil, The Thing, and Carrie.
The VFX team mainly used Houdini to tackle this project, all the buildings and model assets were build with destruction compliance in mind. The destruction was done by the system Bullet and a combination of Voronoi and custom fracturing tools. And the explosions, smoke and fire simulations were all created with Pyro in Houdini. For the actual eruption of the volcano Christ used multiple instanced Pyro containers to get the resolution needed for the massive event. For the lava bombs the FX artists also used Pyro but clustered the containers to create the trails, and the lava rivulets were produced with Houdini's L System. The FX were all rendered in Mantra, so they had to mesh out the FX for many of the shots for proper lighting and shadow translation into their Maya/V-Ray pipeline.

The third film I researched in to was 'Harry Potter and the Order of the Phoenix', where the VFX was mainly constructed by Double Negative. As well as handling much on the exterior work for Hogwarts, Double Negative also created an extensive sequence set within the hidden Room of Requirement. This is one of my favourite scenes within the film because of the amount of detail that went into the visual effects due to the fact that when the students start producing the Patronus spell each person has their own animal within the spell. The Patronus spell was completely redesigned by Double Negative so that each student had their own unique version of the spell. Double Negative creature animators used Maya to produce the veritable menagerie of otters, dogs, hares and hourses, which weave their ways between the students in spirited fashion. The 3D creatures were used to generate particles coming out of them which then were used to create spiraling trails. The particle trail was then mapped with VFX shaders producing complex, coruscating patterns of light.
Monday 9 January 2017
CoP 3: Adding Foam to The Simulation
I've now applied foam to the stairwell simulation, which to me makes it look way more realistic than before. Adding the foam wasn't too hard and all I had to do was adjust some of the foam attributes to make it fit well with the situation. The changes I made to the foam were, changing the emission rate from 1000- 2000 particles per frame (PPF), changing the liquid speed from 0.2 to 0.1 which produces more foam the faster the liquid is, and I also changed the liquid churn from 0.5 to 0.1 so that again more foam would appear when the wave curdles over. Lastly I changed the render particle size from 0.025 to 0.006 just so the the foam would look more realistic when rendered out.


This, and I don't know how, also fixed the problem I had with the water coming out looking black when I render that out. But yeah now I'm able to simulated real looking water with foam. Plus applying the foam also create more of a character element to the simulation because it gives it more of a frantic look to the water when it bursts out of the windows.

Rendering the foam on the other hand was another challenge because again the shaders I was putting on the foam weren't rendering how I wanted them to render. The thing that was happening was that the foam was rendering out like little grey balls which was very confusing, but after looking online for the problem I found a solution. The solution was that I needed to go into the hypershader and add an aiUserDataFloat and a RampColor to the texture of the foam, which helped change the colour of the foam to white and made it look more like realistic foam.


This, and I don't know how, also fixed the problem I had with the water coming out looking black when I render that out. But yeah now I'm able to simulated real looking water with foam. Plus applying the foam also create more of a character element to the simulation because it gives it more of a frantic look to the water when it bursts out of the windows.
CoP 3: More Practical work / Problems that Accrued
Continuing with the stairwell simulation where the water is crashing through the windows, I've managed to increase the amount of particle coming through the window by adding an accelerator behind it to give it more force when crashing through the window. I feel like this brings more character element to the simulation because it gives the waves more of an aggressive look. I've also increased the density of the liquid so that it flows more smoothly through the window and stairs.

I'll start with the problems I've been having with the stairwell simulation, the crucial things are that when applying new texture to the liquids mesh it just seems to go black whenever I render it out. I don't know whether it's something to do with the hypershader in Maya or if I'm just applying the texture wrong I'm not sure. However when I look at the simulation in the normal project scene it looks completely fine.


I'll start with the problems I've been having with the stairwell simulation, the crucial things are that when applying new texture to the liquids mesh it just seems to go black whenever I render it out. I don't know whether it's something to do with the hypershader in Maya or if I'm just applying the texture wrong I'm not sure. However when I look at the simulation in the normal project scene it looks completely fine.


Another thing I' having a problem with is that whenever I now open my scene in Maya I can't save anything new on the scene and it just comes up with an error saying "Unable to override the file". This means I'm having to make changes, writing the changes I've done down, and then not save when I close Maya, meaning I've got to spend twice as long setting up my scene again before I can do anything else with it.
Sunday 8 January 2017
CoP 3: Case Study 2 'Twister' (1996)
The second case study I wanted to do was 'Twister' the 1996 thriller about storm chasers creating advance weather alert systems while dealing with violent tornados. I chose this film because it was the film that set the bench mark for creating realistic tornados using particle simulations, and again ILM was faced with the task of realistic tornados but with the help from Stefen Fangmeier who had experience in creating tornados due to the fact that he worked with the National Centre for Supercomputing at the University of Illinois learning the science behind how tornados were formed.
Jan De Bont, the director, wanted real tornados in his film but after the photograph team attempted to chase a tornado, they had not luck. This meant that ILM had to develop a new effects systems that would contribute to bring realism into the way of creating a tornado. Fangmeier explained that, "a tornado is a ton of dirt and dust in a swirling mass along with moisture and cloud matter, that makes particle systems really the foundation of a tornado" (Fangmeier. S, 2016). This meant that ILM had no other choice but to use particle simulations for the tornados so that they could get the realism effect. However back in 1996 they didn't have the technology we have today so the computers produced low quality simulations.
The technology that ILM used for the film ‘Twister’ was a piece of 3D software called ‘Wavefront Dynamation’, which Fangmeier also added some plug-ins that ILM was using of other films. They used another software called ‘Softimage3D’ to do all the animation in. For the architecture of the tornado there would be around five to ten million particles. But before starting the simulations the animators first constructed and created a routine for the movement of the tornado using a wireframed funnel that could be manipulated to move like a tornado. So using the wireframe funnel ILM were able to animate it with different controllers and the emit particles off of the wireframe funnel to create the tornado effect.

This is a great way of controlling the tornado and adding character elements to the movement, but I don't think that this technique is what I'll be using for my simulations because times have changed and I can produce something like this without using a wireframe being the controller.
Jan De Bont, the director, wanted real tornados in his film but after the photograph team attempted to chase a tornado, they had not luck. This meant that ILM had to develop a new effects systems that would contribute to bring realism into the way of creating a tornado. Fangmeier explained that, "a tornado is a ton of dirt and dust in a swirling mass along with moisture and cloud matter, that makes particle systems really the foundation of a tornado" (Fangmeier. S, 2016). This meant that ILM had no other choice but to use particle simulations for the tornados so that they could get the realism effect. However back in 1996 they didn't have the technology we have today so the computers produced low quality simulations.
The technology that ILM used for the film ‘Twister’ was a piece of 3D software called ‘Wavefront Dynamation’, which Fangmeier also added some plug-ins that ILM was using of other films. They used another software called ‘Softimage3D’ to do all the animation in. For the architecture of the tornado there would be around five to ten million particles. But before starting the simulations the animators first constructed and created a routine for the movement of the tornado using a wireframed funnel that could be manipulated to move like a tornado. So using the wireframe funnel ILM were able to animate it with different controllers and the emit particles off of the wireframe funnel to create the tornado effect.
CoP 3: Case Study 1 'Battleship' 2012
I've decided to do two different case studies for my dissertation, the first one being about the water simulations produced by ILM for the action film 'Battleship' that came out in 2012. I chose to do a case study on this because of how complex and large the simulations were, and how ILM were going to face the challenges it draught.

How they fixed this was that they placed on top a FLIP PIC solver for particle based simulations. This granted the GRID approach to simulate the extensive oceans but also granting, in the same scenes, over twenty million particles to be thrown up alongside the ships. Because the film used a lot of water sequences it was vital for ‘Battleship’ that the water breaks up into batches and then droplets and eventually scatters in to mist. Through the waters lifespan it gradually gets more influenced by wind currents and airfields. For ILM this was a new type of physics and rendering pipeline of water to figure whilst using new toolsets created by the CG supervisor Willi Geiger (Desowitz. B, 2012). Grady Cofer explained how they created this effect and how they managed to render this out for the film saying,
“we wanted to render everything together as a volume so that when we’re representing sunlight, say, that the sun is actually refracting through dense parts of water and then breaks up and illuminates in a scattered way.” (Cofer. G, 2012).
Not only did ILM create a new way in simulation large amounts of water with loads of detail but they also went that bit further and created a way the air was affected. Affecting the air in turn altered how the water comes off the waves and splashes as mist, and how the mist acted, and how the actions aerify the water and produced white water. This makes the simulation an amazing step up in realism and in an interview with the VFX supervisor Grady Cofer he says that “once we found the key to the air fields around out splashes, it really injected a lot of realistic.” (Cofer. G, 2009). ILM had another trick up their sleeve by developing a system called ‘ballistic particles’, that generates particles, which animators can implant in to the simulation, to erupt scientifically and add extra commotion to the simulation. This method of simulation brings a certain realism to the scene that adds haphazardness and unreliability in the water, it also creates character to the water due to the energy the water is simulating.
For the film ILM formed an internal group called the "Battleship Water Project" that focused on the water simulations and helped improve the pipeline of the software being used for the film. Because the film had to produce large scale simulations the team had to come up with a new way of creating the simulations without destabilizing and loosing detail in the water simulation. Grady Cofer said that “even at a grid size that might resolve to real word scale of two-foot square, you are losing a lot of detail, there is so much fine detail in these complex water structures that you just don’t get from the based simulation.” (Cofer. G, 2009)

How they fixed this was that they placed on top a FLIP PIC solver for particle based simulations. This granted the GRID approach to simulate the extensive oceans but also granting, in the same scenes, over twenty million particles to be thrown up alongside the ships. Because the film used a lot of water sequences it was vital for ‘Battleship’ that the water breaks up into batches and then droplets and eventually scatters in to mist. Through the waters lifespan it gradually gets more influenced by wind currents and airfields. For ILM this was a new type of physics and rendering pipeline of water to figure whilst using new toolsets created by the CG supervisor Willi Geiger (Desowitz. B, 2012). Grady Cofer explained how they created this effect and how they managed to render this out for the film saying,
“we wanted to render everything together as a volume so that when we’re representing sunlight, say, that the sun is actually refracting through dense parts of water and then breaks up and illuminates in a scattered way.” (Cofer. G, 2012).
Not only did ILM create a new way in simulation large amounts of water with loads of detail but they also went that bit further and created a way the air was affected. Affecting the air in turn altered how the water comes off the waves and splashes as mist, and how the mist acted, and how the actions aerify the water and produced white water. This makes the simulation an amazing step up in realism and in an interview with the VFX supervisor Grady Cofer he says that “once we found the key to the air fields around out splashes, it really injected a lot of realistic.” (Cofer. G, 2009). ILM had another trick up their sleeve by developing a system called ‘ballistic particles’, that generates particles, which animators can implant in to the simulation, to erupt scientifically and add extra commotion to the simulation. This method of simulation brings a certain realism to the scene that adds haphazardness and unreliability in the water, it also creates character to the water due to the energy the water is simulating.
Relating this back to my practical, it taught me that I could use other forces to manipulate the particles to give the simulation some sort of character element. Adding an accelerator to a simulation or a force field will give the particles multiple directions in with they could move about, this is what I will try out in my next simulation.
Tuesday 3 January 2017
CoP 3: Piece of Text / Interview That Inspired My Subject
While having a conversation over email with Oliver Winwood he mentioned that he had worked on films such as 'Harry Potter', 'Batman Begins', 'Guardians of the Galaxy', and 'World War Z' using particle simulations and how he used and controlled them. There are two things that he said in them emails that really inspired my subject. One is about how he controls the particles in a simulation and the other is about what softwares he and other practitioners use.
Oliver talked about how he controlled the particles using a fluid within Maya. The thing that he said which inspired me was this, "I worked on a few of the Potter films where we used maya particles. The main reason is due to how scriptable they are. We obviously apply forces, but also script a lot as well, giving us very precise control over what happens and when. Another favourite trick is to advect the particles with a fluid. It doesn't even need to be that high res as you're using the fluid as a force." (Winwood. O, 2016) This gave me the idea to try this out in Maya and tried using particles with a fluid. This what a great way of manipulating the particles with a good amount of control and this was the outcome of my simulation.

Oliver talked about how he controlled the particles using a fluid within Maya. The thing that he said which inspired me was this, "I worked on a few of the Potter films where we used maya particles. The main reason is due to how scriptable they are. We obviously apply forces, but also script a lot as well, giving us very precise control over what happens and when. Another favourite trick is to advect the particles with a fluid. It doesn't even need to be that high res as you're using the fluid as a force." (Winwood. O, 2016) This gave me the idea to try this out in Maya and tried using particles with a fluid. This what a great way of manipulating the particles with a good amount of control and this was the outcome of my simulation.

However I found the method behind this a bit complicated and hard to render out with arnold renderer. So I feel like I will be sticking with bifrost for the final simulation I will be producing.
The other thing that Oliver said that gave me some inspiration and intriguement was this, "I would say for pure particle work Maya is easily and strong as Houdini. But you will find more artists comfortable doing the work in Houdini. I also feel (and I know others who are Houdini artists that share this opinion) that simple Maya effects are easier and quicker to achieve in Maya, while you have to build something in Houdini. Of course once you start getting into more complicated FX where you are manipulating geo along with the particles Houdini is far easier." (Winwood. O, 2106) Him saying this made me feel more confident using Maya for my simulations because its as strong as Houdini, but for me Houdini is too expensive to get right now to try it out and experiment around with its liquid simulator.
CoP 3: Even More Practical Work
After all the smoke simulations I've done I decided to go back to liquid simulations because I thought that I could get more character elements out of it due to the fact that for me it is easier to control the particles. For this simulation I wanted to have some sort of disaster feel to it like in films such as 'Day After Tomorrow' or 'Battleship', so I created a stairwell with windows and then had a liquid simulation burst through the windows. For this I wanted to make it as realistic as possible so I made the stairwell as normal and then shrunk it down to about 0.1cm from 50cm, so that when I come to use the bifrost system it simulates at a small scale and then when it's simulated I can scale it back up and without the scene loosing any resolution. Doing this fixes the gloopy problem I was having before with my first liquid simulation because I've take the gravity field within bifrost into consideration so that when I shrunk the model to 0.1, the gravity within bifrost doesn't need changing because its pre set to 9.8 meters per second, which means that the 0.1 scale model is now at the right measurements for bifrost to work realistically.
I did two different simulations to test out how the liquid would move and act in the environment that surrounds it. One was where I had about 10 million particles in the simulation and the other was where I had about half of that so 5 million particles. I found that having less particles in the simulation actually had more effect than the bigger simulation because with the bigger simulation it just looked like the liquid was too linear and didn't have much movement and character element in it. Where as the simulation that had 5 million particles in it had more space to move about in the environment which gives the crashing wave a more dramatic effect and gives it a characteristic element.
I then gave the particles a mesh and textured the mesh so that it looks more like water and so I could see how it would look as an object and how it would react to light.
Monday 5 December 2016
CoP 3: More Practical Work
Continuing with smoke simulations I've tried to create a character element in the animation using the particles. I created this using 3d containers, fluid systems and nParticles in Maya, however I used the new Arnold renderer in maya to render out the animation but using this means that I can't batch render it without it leaving water marks on the screen. I avoided this by using the render sequence renderer in maya but I don't think that it rendered the full simulation because you can still see the particles flying through the scene.
In one way this shows how the particles work in the simulation and see what the particles are doing and how they react to one another in the simulation.
For this simulation I'm using maya so the solver for this simulation is the FLIP solver, which is great at small to medium fluid simulations because particles are able to flow on top of each other without destabilizing and flying off every where.
For the character element in the simulation I wanted the particles to seem like they are trapped in box and they are trying it escape by crashing into the walls of the box. I wanted to create the feel like the particles were going to suffocate due to the smoke trail it leaves building up in the box. Doing this gives the audience some emotional connection to the particles because the audience worries about the particles.
However I will be re-rendering this simulation out again using Mentalray so that it won't leave water marks, and so that it will render out fully and get more effect out of the simulation. Below is a frame of what a proper rendered out version should look like. (sorry that the image is a bit dark)

Subscribe to:
Posts (Atom)